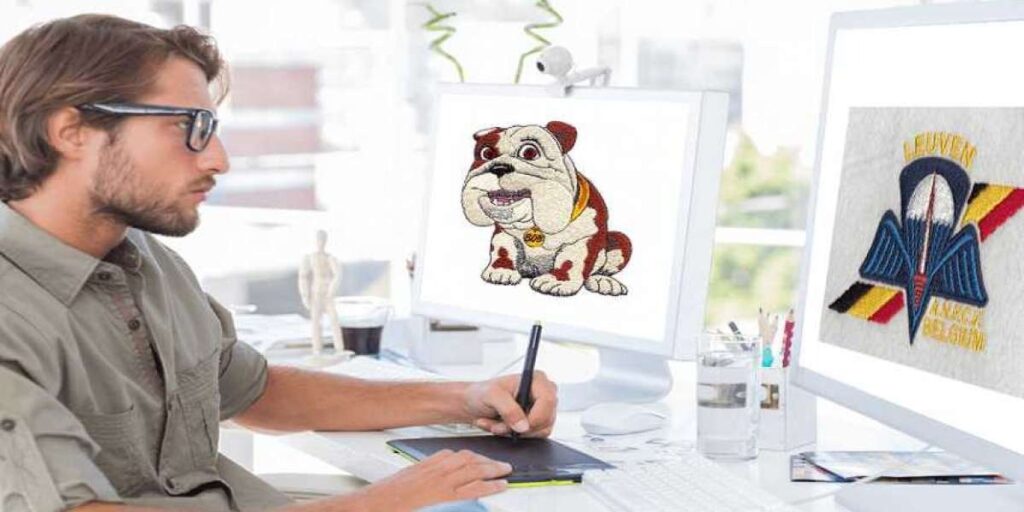
If you have ever tried to turn a simple JPEG of your company logo or a cute drawing into an embroidery design, you quickly learn one thing. Your Brother embroidery machine does not read pictures. It reads stitches. That is where Brother PES file conversion saves the day. You get to take any image, logo, or sketch and transform it into a digital file full of thread colors, stitch directions, and layer information. Once you understand how this works, you stop wrestling with your machine and start creating professional looking embroidery with way less trial and error.
Let me walk you through exactly how to convert images and logos into PES files the smart way. No jargon overload. Just real steps, real tools, and real advice you can use today.
What Exactly Is a PES File and Why Your Brother Machine Needs It
A PES file is the native format for Brother embroidery machines. Think of it like a recipe. A normal picture tells your computer what colors to show on a screen. But a PES file tells your embroidery needle exactly where to punch, how long each stitch should be, when to change thread colors, and which direction each stitch travels. Without that detailed map, your machine just sits there confused.
When you try to load a standard image file like a PNG or BMP directly onto your Brother machine, nothing happens. The machine does not see pixels. It sees commands for movement and thread. So you need a middle step. That middle step is conversion software that reads your image and rewrites it as stitch by stitch instructions.
The Real Challenge with Converting Logos into Embroidery
People often think they can just drop their logo into a converter and get a perfect embroidery file in seconds. That works if your logo is a simple one color shape with no small text or fine details. But most logos have gradients, tiny letters, drop shadows, or overlapping colors. Those things look great on a website but turn into a tangled mess on fabric.
Embroidery thread has thickness. A needle can only make stitches so small. When you try to force a detailed logo through automatic conversion, you usually end up with blobs instead of letters and threads that cross in weird ways. The trick is not just converting. The trick is preparing your image so the software understands what matters.
Best Tools for Brother PES File Conversion without Breaking the Bank
You have real options here. Some cost money, some are free, and a few sit right in between.
SewArt is a popular choice for hobbyists. It costs around sixty dollars and handles automatic conversion reasonably well. You load your image, pick some settings, and it spits out a PES file. Not perfect every time, but solid for simple designs.
Embrilliance StitchArtist gives you more control if you want to manually adjust stitch paths. It feels more like drawing with thread than pressing an auto convert button. The learning curve is steeper, but the results look cleaner.
For free options, InkScape with the InkStitch plugin works surprisingly well. You do need patience because InkStitch expects you to understand vector paths before it makes sense. But free is free, and many people get great results after watching a few YouTube tutorials.
Online converters exist too. Sites like Convertio or Embroideres offer quick browser based conversion. Just upload your image, pick PES as the output, and download the file. Convenient, but you lose control over stitch density, pull compensation, and color order. Fine for testing, risky for final products.
How to Prepare Your Image Before You Convert
Garbage in, garbage out. That saying lives everywhere in digital work, and embroidery conversion is no different. If you feed the software a blurry low resolution logo, you get a blurry low stitch mess. Here is how to prep like someone who actually knows what they are doing.
First, simplify your colors. Aim for five or fewer thread colors unless you enjoy changing bobbins every two minutes. If your logo has a gradient, replace it with two solid colors. Thread does not do smooth gradients.
Second, remove tiny details. Any text smaller than a quarter inch in real life will not stitch clearly. Any line thinner than a pencil mark will vanish or break. Either enlarge those elements or accept that they need to be simpler.
Third, work at high resolution. Start with an image at least 300 pixels per inch. Low res images get jagged when converted because the software guesses what the fuzzy edges mean.
Fourth, increase contrast. Make your foreground colors much darker than your background. That helps the software distinguish shapes from empty space.
Step by Step Walkthrough of a Typical Conversion
Let me run through a real example. You have a logo. It is a blue circle with white text in the middle. You want to turn this into a Brother PES file using SewArt as your tool.
Open SewArt and import your logo image. The software shows you a preview. Now you adjust the brightness and contrast sliders until the blue circle looks solid and the white text stands out clearly.
Next, you tell the software how many colors to use. You pick blue for the circle and white for the text. The software analyzes the image and creates stitch regions for each color.
You then check the stitch direction. The automatic setting usually runs horizontal stitches. But for a circle, you might want satin stitches that follow the curve. You manually adjust that by drawing a few lines to guide the software.
After that, you set stitch density. More stitches means more detail but also more thread break risk and longer sew times. Less stitches sews faster but looks sparse. For a logo on a polo shirt, medium density works fine.
Finally, you export as a PES file, copy it to a USB drive, and plug that drive into your Brother machine. The machine reads the file, shows you a preview, and you hit start.
Common Mistakes That Ruin Your PES Files
People make the same errors over and over. Skipping the pull compensation step is the biggest one. When thread pulls on fabric, it shrinks the design slightly. Smart conversion software lets you add pull compensation, which means making the design a few percent larger in key areas so after the thread pulls, it looks the right size.
Another mistake is ignoring underlay stitches. Underlay is a base layer of stitching that stabilizes the fabric before the top stitches go down. Without underlay, your design sinks into fluffy fabrics like fleece or stretches weirdly on knits.
Also, people forget to test on scrap fabric. Do not sew your first conversion onto the final shirt or jacket. Run a test on a similar piece of scrap material first. You will see problems like thread tension issues, color order mistakes, or registration problems before they ruin your real project.
When to Hire a Professional Digitizer
Here is the honest truth. Automatic conversion works great for personal projects, simple shapes, and learning the craft. But if you need a commercial quality logo on fifty uniform shirts, hire a professional digitizer. They charge maybe ten to twenty dollars per design. They manually place every stitch, adjust for fabric type, and deliver a PES file that sews cleanly every time.
You save hours of frustration and avoid wasting expensive thread and fabric. Professional digitizers also know tricks like adding jump stitches that automatically cut, using tatami fills for large areas, and setting stop commands for color changes exactly where they make sense.
Conclusion
Brother PES file conversion turns your ordinary images and logos into files your embroidery machine actually understands. Start with clean high contrast images, pick software that matches your skill level, and always test on scrap fabric before your final product. Automatic converters work fine for simple designs, but do not be afraid to pay a professional for complex logos. With a little practice, you will go from staring at error messages to stitching out custom designs that look exactly how you imagined. Grab a simple logo, run it through one of the tools mentioned here, and see what your Brother machine can really do.