Plastic is one of the most challenging surfaces when working with grout. Unlike ceramic, porcelain, or natural stone, plastic has a smooth, non-porous surface that prevents traditional cement-based grout from forming a strong bond. If you’re repairing a shower, finishing a backsplash, or installing decorative tiles near plastic trim, understanding the right preparation methods can save you time and frustration.
This guide explains practical ways to improve grout adhesion and avoid common mistakes.
Why Grout Has Trouble Bonding to Plastic
Standard grout is designed to lock into rough, porous materials. Plastic does not absorb moisture or provide enough surface texture for grout to grip.
Common reasons grout fails on plastic include:
- Smooth surface with little texture
- Poor surface preparation
- Dust, grease, or soap residue
- Using the wrong type of grout
- Movement in plastic components
Without proper preparation, grout may crack, loosen, or fall away after curing.
Best Methods to Help Grout Adhere Better
The following techniques improve the chances of creating a stronger bond.
| Method | Why It Helps | Recommended |
|---|---|---|
| Clean the plastic thoroughly | Removes grease and residue | ✅ Yes |
| Lightly sand the surface | Creates microscopic scratches for grip | ✅ Yes |
| Use a bonding primer | Improves adhesion | ✅ Yes |
| Choose epoxy grout | Bonds better than cement grout | ✅ Best Option |
| Allow proper curing time | Prevents early failure | ✅ Essential |
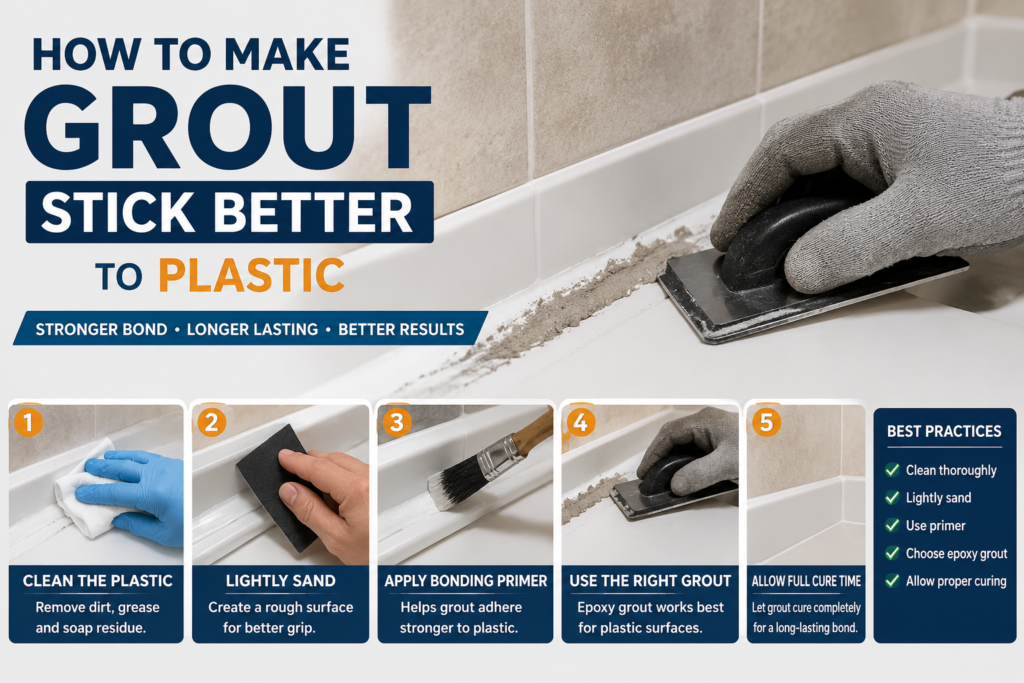
Step 1: Clean the Surface
Any dirt, soap scum, oil, or wax will reduce adhesion.
Before applying grout:
- Wash with warm water and mild detergent.
- Remove grease using rubbing alcohol.
- Dry the surface completely.
Even a small amount of residue can weaken the bond.
Step 2: Lightly Sand the Plastic
A glossy plastic surface offers very little grip.
Use fine-grit sandpaper (around 120–220 grit) to gently roughen the area. You don’t need deep scratches—just enough texture for better mechanical bonding.
After sanding:
- Wipe away all dust.
- Let the surface dry before continuing.
Step 3: Apply a Bonding Primer
Some bonding primers are designed to improve adhesion on smooth surfaces like PVC and plastic.
Always follow the manufacturer’s instructions and allow the primer to dry fully before applying grout.
A primer creates an intermediate layer that helps the grout stay attached longer.
Step 4: Select the Right Grout
Not all grout performs the same on difficult surfaces.
Cement-Based Grout
- Easy to use
- Works well on porous tile
- Limited adhesion on plastic
Epoxy Grout
- Stronger bond
- Water resistant
- Better for wet environments
- More durable around plastic trim
If plastic is part of the installation, epoxy grout is usually the better choice.
Step 5: Apply Grout Carefully
Press the grout firmly into joints rather than simply spreading it over the surface.
Remove excess grout with a damp sponge while avoiding excessive water, which can weaken fresh grout.
Work in small sections for better control.
Step 6: Allow Full Cure Time
Many grout failures happen because the surface is disturbed too early.
Follow the curing time recommended by the manufacturer.
Avoid:
- Heavy cleaning
- Water exposure
- Scrubbing
- Pressure on the joint
Giving grout enough time to harden improves long-term durability.
Common Mistakes to Avoid
Many DIY projects fail because of simple preparation errors.
Avoid these mistakes:
- Applying grout over dirty plastic
- Skipping sanding
- Using too much water while cleaning
- Moving plastic fixtures before curing
- Ignoring expansion joints
Taking a few extra minutes during preparation often leads to a much stronger result.
When Silicone Is a Better Choice
Sometimes grout is not the right material.
If the joint experiences frequent movement, silicone sealant may perform better than grout.
Examples include:
- Bathtub edges
- Shower corners
- Plastic shower surrounds
- Window frames
- Expansion joints
Flexible sealants resist cracking better than rigid grout.
Related Resources
If you’re working on tile projects, these guides may also help:groutcleaner.com/does-grout-stick-to-plastic
- Does Grout Stick to Plastic
- Will Grout Stick to Plastic
- Grout Line Size Chart
These resources explain surface compatibility, proper spacing, and installation best practices.
Frequently Asked Questions
Can grout permanently stick to plastic?
Traditional cement grout usually does not create a permanent bond with smooth plastic. Proper preparation and epoxy grout improve performance but may not create the same bond as tile.
Is sanding plastic necessary?
Yes. Light sanding creates surface texture that helps improve grout adhesion.
Which grout works best on plastic?
Epoxy grout generally provides stronger adhesion and better moisture resistance than standard cement grout.
Should I use a primer before grouting?
A bonding primer can improve adhesion on smooth plastic surfaces and is recommended whenever possible.
Can I grout directly over PVC?
PVC is also non-porous. Cleaning, sanding, and using epoxy grout produce better results than applying standard grout directly.
Final Thought
Getting grout to stay on plastic requires more preparation than grouting traditional tile. Cleaning the surface, lightly sanding, using a bonding primer, and selecting epoxy grout can significantly improve adhesion and reduce future cracking or separation.
While no method guarantees a permanent bond on every plastic surface, following these best practices gives your project a much better chance of lasting for years. When movement is expected, consider using a flexible sealant instead of grout for the most durable finish.